
Getting Started
Welcome to the Lightning Payroll API. We use the OAuth 2.0 Authorization Code flow so your app can access customer payroll data securely and in a way developers already know.
/schema/openapi.json/schema/components/index.json/schema/operations/index.json/schema/endpoints/create-pays-for-date.json/schema/components/PayCreate.json/schema/components/PayCreate.json?resolved=true
OAuth Authentication Guide
API Admin Setup and Management Guide
Employee Lifecycle Guide (setup, termination, reinstatement)
GL Settings and Exports Guide (partial edits, resets, Farm Focus, CSV/PDF)
Webhooks Guide (events, signing, retries)
API Branding & Co-Branding Guide
Company Redirect Guide
Partner Session Handoff Guide (sign a user in without a password, using a token you already hold)
Partner Checkout Admin Endpoints Guide (includes free trials)
Lightning Payroll Partner Program
Environments
| Environment | Base URL | Notes |
|---|---|---|
| Production AU | https://api.lightningpayroll.com.au | Live AU-hosted customer data |
| Production NZ | https://api.lightningpayroll.co.nz | Live NZ-hosted customer data |
| Development | Issued with your partner credentials | AU and NZ sandbox hosts, plus their matching app hosts, are supplied when your partner account is set up. |
https://api.lightningpayroll.com.auDefault AU production host:
https://api.lightningpayroll.com.auUse the AU or NZ hostname that matches the customer-facing deployment you are integrating with.
Getting API Access
To access the Lightning Payroll API, your company must first be granted access by our development team. This step ensures only approved clients can generate credentials for secure integration.
If you don’t yet have access, please contact our team here to get started.
Once access has been granted, you'll be able to visit the API Management section of your admin dashboard to create a Client ID and Client Secret. These are required to begin the OAuth 2.0 Authorisation Code flow described above.
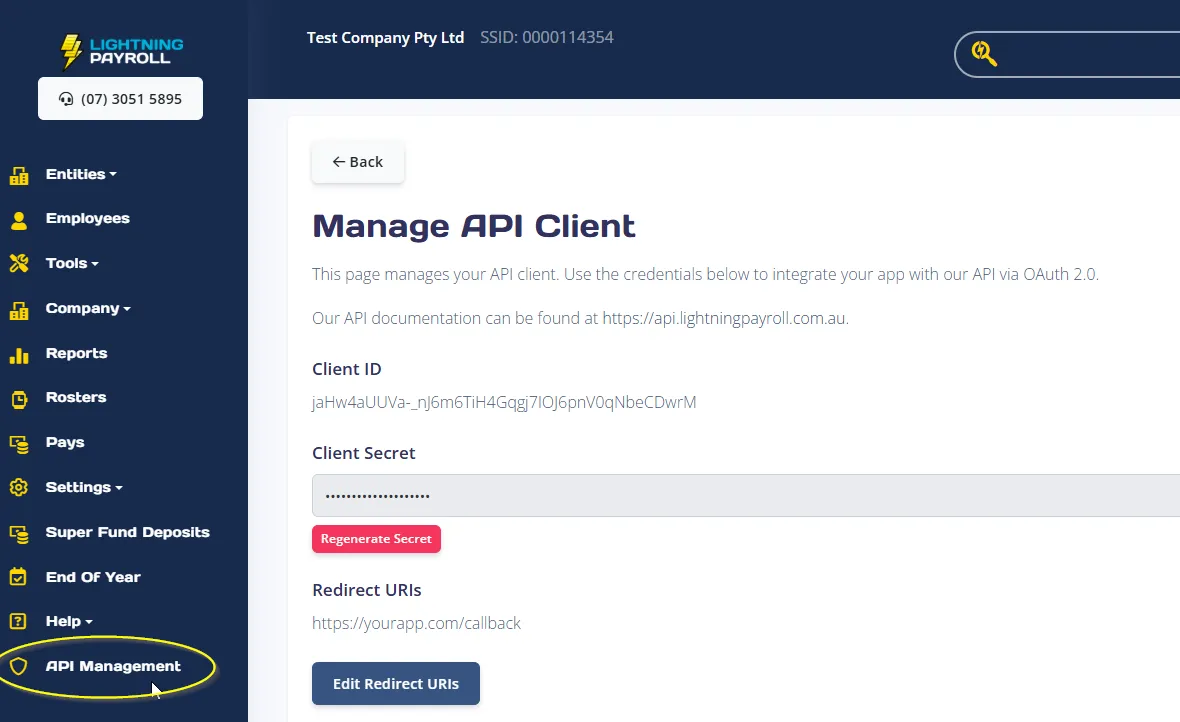
Authorization Code Flow
Replace
{base} with the environment you’re targeting.
GET {base}/api/oauth/authorize?
  client_id=YOUR_CLIENT_ID
  &redirect_uri=https%3A%2F%2Fyourapp.com%2Foauth
  &state=xyz123
  &scope=openid%20payroll.write
code.We redirect back to
redirect_uri with ?code=…&state=…. The code is single-use and valid for 10 minutes.
POST {base}/api/oauth/token
Content-Type: application/x-www-form-urlencoded

grant_type=authorization_code&
code=THE_CODE_FROM_STEP_2&
client_id=YOUR_CLIENT_ID&
client_secret=YOUR_CLIENT_SECRET&
redirect_uri=https%3A%2F%2Fyourapp.com%2Foauth
Successful response:
{
  "access_token":  "…",
  "token_type":    "Bearer",
  "expires_in":    1800,
  "refresh_token": "…",
  "refresh_expires_in": 2592000
}
Include
Authorization: Bearer <access_token>.
When it expires, swap the refresh_token for a fresh pair:
POST {base}/api/oauth/token
grant_type=refresh_token&
refresh_token=YOUR_REFRESH_TOKEN&
client_id=YOUR_CLIENT_ID&
client_secret=YOUR_CLIENT_SECRET&
redirect_uri=https%3A%2F%2Fyourapp.com%2Foauth
Token Lifetimes
| Credential | Valid for | Notes |
|---|---|---|
Authorization code | 10 minutes | Single use. Exchanging it a second time fails. |
access_token | 30 minutes (expires_in: 1800) | Send as Authorization: Bearer. |
refresh_token | 30 days (refresh_expires_in: 2592000) | Rotated on every use. See below. |
grant_type=refresh_token exchange revokes the refresh token you just sent and returns a brand new one. If you keep re-sending the original, the second attempt fails and the customer has to authorize again. Persist the refresh_token from every token response, overwriting the previous value, and serialise refreshes so two workers cannot race and revoke each other's token.
Authentication Endpoint Reference
| Path | Description |
|---|---|
GET /api/oauth/authorize | Starts the Authorization Code flow (302 redirect to sign-in / consent screen). |
POST /api/oauth/token | Exchanges an authorization code or refresh_token for fresh tokens. |
GET /api/company (example protected) | Lists companies the authenticated customer can access. |
GET /api/employees/{employee_id}/super-funds | AU only. Employee super-fund endpoints are not used for NZ payroll flows. |
POST /api/single-touch/{company_id}/submit-stp-pays | AU only. STP endpoints remain available on the public API but should not be used for NZ filing. |
Scopes
Request scopes as a space-separated list in the scope query parameter of the authorize step. Ask only for what you need: the scope set is fixed at authorization time, so widening it later means sending the customer back through consent.
| Scope | Grants |
|---|---|
openid | Identity. Request this in every flow. |
payroll.read | Read-only access to payroll data. Sufficient for every GET on a company you have access to. |
payroll.write | Create and modify payroll artefacts. Required for every non-GET payroll call, and also satisfies reads. |
partner.checkout.preview | Reseller partners only. Priced previews, meaning dry_run: true order and upgrade requests and subscription-end previews, plus the read-only discovery endpoints. |
partner.checkout.write | Reseller partners only. Placing real orders, upgrades and trials (dry_run: false). Required for the Partner Free Trials flow described below. |
partner.checkout.cancel | Reseller partners only. Cancelling a partner-checkout order or trial, or ending a client's subscription early. |
openapi | Accepted for backward compatibility. Interactive dashboard sessions carry it by default, but no endpoint requires it, so there is no reason to request it. |
403 with {"detail": "Missing required scope: <scope>"}, naming exactly what was missing, so read the detail string rather than guessing.
Partner Free Trials
If you are a reseller partner, you can start a client on a free one-month trial without placing a billed order. A trial creates no order, so it never reaches an invoice and is never renewed. When the trial ends you place the real order against the same client. Trial emails carry your own branding where you have white-label branding configured.
Send the client and company details. Only the company identifier decides the country:
abn for Australia, ird_number for New Zealand. A billing address is optional, because nothing is billed.
POST {base}/api/partner-checkout/trials
Authorization: Bearer YOUR_ACCESS_TOKEN
Idempotency-Key: 6f1c9a2e-trial-0001

{
  "customer": {
    "first_name": "Alice",
    "last_name": "Nguyen",
    "email": "alice@example.com",
    "phone": "+61 7 3000 0000"
  },
  "company": {
    "legal_name": "Sunrise Hospitality Pty Ltd",
    "abn": "10000000000"
  }
}
Keep the returned customer_id and subscription_trial_id. The client is emailed a link to set their password and begin.
Poll for the trials you created and watch
days_remaining. Filter with ?status=active, expired, or cancelled.
GET {base}/api/partner-checkout/trials?status=active
Each row also reports converted and converted_order_id, so you can tell which clients you have already ordered for.
Place a normal order and add
end_customer_id. No new client is created, the billing address is updated in place, and the running trial subscription is retired so the paid plan's limits take effect.
POST {base}/api/partner-checkout/orders
Idempotency-Key: 6f1c9a2e-order-0001

{
  "dry_run": false,
  "end_customer_id": 192601,
  "customer": { "email": "alice@example.com", ... },
  "company":  { "legal_name": "Sunrise Hospitality Pty Ltd",
                "abn": "10000000000" },
  "billing_address": { ... },
  "order": { "product_id": 243 }
}
customer.email must match the client named by end_customer_id, so an order can never be attached to the wrong account.
A client who still has a live paid subscription gets a 409 instead of a second, overlapping one: change that plan with /upgrades or its renewal, or end it first with /subscriptions/end.
order.add_free_trial_month defaults to true and adds an extra month, so a monthly signup gets 2 months and an annual signup gets 13. A client who has already had a free trial does not get it a second time. The order still succeeds: free_trial_month_applied comes back false and warnings explains why. Read that field rather than assuming, so you never quote a client 13 months and deliver 12.
POST /api/partner-checkout/trials/cancel if it was provisioned against the wrong entity. Access ends immediately and the records are kept for audit. Full details, including every field and error code, are in the Partner Checkout Admin Endpoints Guide.
Using Your Access Token
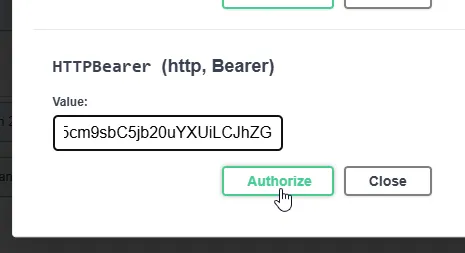
Once you have received an access_token, you can begin calling protected endpoints by including it in the Authorization header of your HTTP requests, using the Bearer scheme:
Authorization: Bearer YOUR_ACCESS_TOKEN
This is required for all endpoints that need authentication. Make sure to replace YOUR_ACCESS_TOKEN with the actual token string you received in Step 3 above.
Webhooks
Rather than polling us for changes, register a URL and we will POST to it when a company, an employee or a completed pay is created, updated or deleted. Every delivery is signed, retried on failure, and recorded in a delivery log you can inspect. Webhook management requires an API admin account; a token whose customer is not an API admin gets 403 on every webhook endpoint.
Event Catalogue
Nine event types across three entities. Name each event you want; there is no wildcard. The authoritative list is returned as availableEvents by GET /api/webhooks, so read it at runtime if you want to pick up additions automatically.
| Entity | Created | Updated | Deleted |
|---|---|---|---|
| Company | company.created | company.updated | company.deleted |
| Employee | employee.created | employee.updated | employee.deleted |
| Pay | pay.created | pay.updated | pay.deleted |
- Pay events only fire for a completed pay, and which one you get depends on how it was completed. A pay inserted already complete in one operation arrives as
pay.created; a pay saved as a draft and completed later arrives aspay.updatedwith no precedingpay.created. Subscribe to both. A draft pay produces nothing at all. - A soft-deleted employee arrives as
employee.deleted, not as anemployee.updatedthat happens to flip a flag. - Repeat changes to the same entity collapse into a single delivery carrying the latest state while that delivery is still undelivered, so expect fewer events than edits. There is no content-based deduplication though, so you can also be handed the same data twice and must tolerate it.
Registering an Endpoint
POST {base}/api/webhooks
Authorization: Bearer YOUR_ACCESS_TOKEN
Content-Type: application/json

{
  "url": "https://yourapp.example.com/hooks/lightning-payroll",
  "events": ["employee.created", "employee.updated", "pay.created", "pay.updated"],
  "description": "Production employee sync",
  "is_active": true
}
Your url must be an absolute http or https URL whose host resolves to a publicly routable address. Use https, because the payload carries payroll data. localhost, .local, .internal, loopback, private RFC1918 ranges and cloud-metadata addresses are rejected with 422 at registration, and the same check runs again on every send, so a host that later becomes unroutable simply fails that attempt and the reason appears in the delivery log. That means you cannot point a registered webhook at your own machine: use a public hostname or a tunnel.
The URL is lightly normalised before storage: surrounding whitespace is trimmed and < and > are stripped. It may be at most 512 characters, and anything longer is rejected with a 422 rather than truncated. description is your own routing note, never sent to your listener; it is trimmed the same way and may be at most 255 characters, likewise rejected rather than truncated.
secret and we generate a strong one. The plaintext value appears only in the create response, and again only if you later rotate it with {"regenerate_secret": true}. No endpoint returns an existing secret, so store it immediately. Rotation is not zero downtime: the new value does not exist until the request returns and is live for queued deliveries the moment it does, and secret is not an accepted key on PATCH. Either accept a brief window of failures and let the retry schedule cover you, or register a second endpoint with your own secret and retire the first.
Verifying a Delivery
Each delivery arrives as a POST with Content-Type: application/json and four X-LP-* headers.
| Header | Meaning |
|---|---|
X-LP-Event | The event type, so you can route before parsing. |
X-LP-Delivery-Id | The delivery's own id, stable across every retry of that delivery. Your idempotency key, best used as the pair (X-LP-Delivery-Id, payload id). |
X-LP-Timestamp | Unix epoch seconds as a decimal string, taken when this attempt was signed. Part of the signed material. |
X-LP-Signature | HMAC-SHA256 hex digest of "{timestamp}.{raw_body}" keyed with your endpoint secret. |
# Python
signed   = timestamp.encode() + b"." + raw_body   # raw_body exactly as received
expected = hmac.new(secret.encode(), signed, hashlib.sha256).hexdigest()
if not hmac.compare_digest(expected, request.headers["X-LP-Signature"]):
    abort(401)
: or , and non-ASCII escaped. Parsing the JSON and re-encoding it produces different bytes and therefore a different digest, which fails in a way that looks exactly like a wrong secret. This is the single most common integration problem. In Express, capture the raw body before express.json() touches it.
Payload Shape
{
  "id": "9f2b1c84-6d1e-4a7f-9c0b-2e5d7a3f8b41",
  "type": "employee.updated",
  "createdAt": "2026-08-07T04:11:07.482913",
  "customerId": 192601,
  "entity": { "type": "employee", "id": 4412 },
  "data": { ... }
}
customerId is the end customer whose data changed, not your own partner account, so it is what you route on to attribute an event to the right client. data is built from the same model the REST API uses for that entity, but through a different serialiser, so parse it permissively: jurisdiction-specific fields are not pruned, and a record that fails strict validation falls back to a raw column dump.
Deduplicate on the pair (X-LP-Delivery-Id, payload id). The delivery id is stable across every retry, and a delivery we have already attempted is never re-armed with different data. A delivery that is still queued and untried can be replaced in place if the entity changes again, so in rare cases one delivery id carries a newer payload. Keying on the pair is safe in both cases: skip work only when both values match something you have already processed.
Delivery Statuses and Retries
Any 2xx response counts as delivered. Redirects are not followed, so a 301 or 302 is a failure. We wait up to 10 seconds, so acknowledge with a 2xx first and do your real work asynchronously.
pending sending delivered retry failed skipped
A failed delivery is retried with doubling backoff for a maximum of 8 attempts: 30s, 1m, 2m, 4m, 8m, 16m, then 32m between attempts. From the first attempt to the last is a little over one hour, after which the delivery is failed and never retried. Treat those times as lower bounds, since due deliveries are picked up on a short recurring sweep. skipped means the endpoint was deleted or deactivated between queueing and sending.
A delivery left in sending because a worker restarted mid-attempt is reclaimed automatically and resumes its remaining attempts, so every delivery settles as delivered or failed rather than stalling.
Read the full Webhooks Guide → Complete field tables, verification snippets for Node, Python and PHP, the signature anatomy, the retry ladder drawn to scale, a listener checklist, and a troubleshooting matrix.Employees
The employee endpoints are where most integrations spend their time: hiring someone, keeping their details current, making them payable, and eventually ending the employment. Employee reads need payroll.read and every write needs payroll.write. There is no separate employee or termination scope, so a token that can write payroll can terminate an employee on any company it can see.
Four Lifecycle Operations
Employment state and record visibility are two independent axes, and conflating them is the most common mistake on this surface. Terminating ends the job and produces a final pay. Deleting only hides the record.
| Operation | Endpoint | What it does |
|---|---|---|
| Terminate | POST /api/employees/{id}/terminate | Ends employment. Creates and processes the final pay, values the unused leave, calculates the tax, and reports the cessation. |
| Reinstate | POST /api/employees/{id}/reinstate | Undoes a termination for a re-hire. Keeps year-to-date figures, the payroll number and the previous termination record. |
| Delete | DELETE /api/employees/{id} | Soft delete. Hides the record, keeps its pays and history, pays nothing and reports nothing. |
| Restore | POST /api/employees/{id}/restore | Undoes a delete. Re-checks the customer's employee limit, so it can return 403. |
Never end employment with a delete. A deleted employee is an unpaid entitlement and a reporting gap. If someone left, terminate them.
Country Drives Validation
On employee create, the country field in the payload itself selects the Australian or the New Zealand required-field rules, not the company's own jurisdiction. Send "country": "AU" and the request must carry tax_file_number plus the four tax-declaration booleans; send "country": "NZ" and it must carry nz_tax_code and usually ird_number. Termination bodies are country-exclusive in the same way: an Australian field sent for a New Zealand employee is rejected with 400 naming the field, not ignored.
Batch Semantics
Create and update both take an array and return one result per entry. 201 or 200 means every entry succeeded; 207 means some did and some did not, so walk the array and read errors on each entry; 422 means schema validation rejected the batch before anything was written. Employee writes do not accept an Idempotency-Key, so make your own retries safe: always send your own number, and read the employee back by it before retrying a create.
Knowing When Something Changed
Three employee events exist: employee.created, employee.updated and employee.deleted. There is no employee.terminated event. A termination arrives as employee.updated with is_terminated now true and termination_date set, so diff those two fields rather than waiting for an event that never comes.
API Conventions
Cross-cutting behaviour that applies across the whole surface. Worth reading once before you write a client.
Rate Limits
Most endpoints share a general limit. Pay endpoints are much tighter and cheap lookups are looser. Limits are enforced per client.
| Limit | Applies to |
|---|---|
| 25 / minute | The default for most endpoints, including all partner-checkout reads and writes. |
| 120 / minute | Cheap lookups such as the allowance list endpoints and address autocomplete. |
| 5 / minute | The pay endpoints, reads as well as writes: listing pay runs, listing pays, fetching a single pay, creating and updating pays, and the workers-comp pay endpoints. Because the list and fetch endpoints are capped here too, do not poll them: request a date range in one call instead of looping per pay. |
| 5 / minute | Payslip PDF rendering. |
Exceeding a limit returns 429 with {"error": "Rate limit exceeded: ..."}. A separate burst guard also returns 429 with {"detail": "Too Many Requests"} and a Retry-After header if you send a sharp spike from one IP. Under heavy load you may also see 503 with Retry-After: 5, which is a transient overload signal rather than a rate limit: retry with backoff.
Idempotency
The partner-checkout write endpoints take an Idempotency-Key header so a network failure cannot double-charge a client. It is required on POST /api/partner-checkout/trials, and on POST /api/partner-checkout/orders and /upgrades whenever dry_run is false. Cancelling an order or trial and ending a subscription take no key, because repeating one returns 409.
| You send | You get |
|---|---|
| A new key | The request is processed normally. |
| The same key with the same payload | 200 with the original stored response, plus idempotency_replayed: true. Safe to retry as often as you like. |
| The same key with a different payload | 409. Keys are not reusable across different requests. |
| No key when one is required | 400. |
| A key longer than 255 characters | 400. |
Keys are scoped to your partner account, so they can never collide with another partner's, but they are shared across orders, upgrades and trials: reusing one key for a different endpoint still counts as a payload mismatch. Generate a fresh UUID per logical operation and keep it for the life of your retries. Do not rely on a key expiring, and do not rely on a key still replaying once your retry window has passed.
Error Shapes
Three different response shapes exist, and a client that only parses one will silently read undefined from the others.
| Shape | When |
|---|---|
{"detail": "..."} | The common case for 400, 401, 403, 404, 409 and most 422s raised by endpoint logic. Read detail first. |
{"status_code": 10422, "message": ..., "data": ...} | Whenever request validation fails, meaning the body or the query string, path or headers. HTTP status is still 422 and there is no detail key, so an out-of-range limit or an invalid status filter lands here too. The status_code field is 10000 plus the HTTP status, not the HTTP status itself. |
{"error": "..."} | Rate limits, and the branding and asset upload endpoints. Also the shape of the generic 500. |
Treat the message and detail strings as human-readable diagnostics rather than stable machine identifiers: branch on the HTTP status, and log the string.
Dates, Money and Lists
- Timestamps are ISO 8601 in UTC with no
Zsuffix and no offset, for example2026-05-02T04:11:07. Parse them as UTC explicitly; most libraries will otherwise assume local time and shift your data. - Money is a JSON number, not a string, and is not zero-padded to a fixed number of decimal places, so
0and1250.5are both normal. Never compare amounts by string equality. Some request bodies accept either a number or a numeric string; responses are always numbers. - Lists vary per endpoint, and there is no
pageparameter anywhere. Partner-checkout lists takelimitplusoffset(default 25, maximum 100). The webhook delivery log takeslimitonly (default 100, maximum 500) with nooffset, so it always returns the newest rows and cannot be paged past 500; narrow it with its filters instead. Some list endpoints, includingGET /api/companyand the company employee list, are not paginated and return everything.
Companies and Access
Payroll endpoints identify the company by path parameter, as /api/company/{company_id}/.... There is no header-based company selector.
- Calling a company you do not have access to returns
403with{"detail": "User does not have access to this company."}. - A company id that does not exist returns
404with{"detail": "Company not found."}onGET /api/company/{company_id}, but most other company-scoped endpoints return400with{"detail": "No company found with the given company_id"}. Treat both as company-not-found. GET /api/companysilently omits companies you cannot access rather than failing, so treat its result as the definitive list of what you may act on. Note this includes omitting on a scope failure: a token with no payroll scope gets200and an empty array rather than a403. If that list is unexpectedly empty, check your granted scopes before concluding the customer has no companies.- Pass only records that belong to the company in the path. A record belonging to a different company is reported as not found rather than returned, and a
404does not distinguish between a record that does not exist and one you may not see. - AU only: the employee super-fund endpoints and the Single Touch Payroll endpoints apply to Australian payroll. They remain callable on the NZ host but are not part of NZ payday filing, so NZ integrations should ignore them.
- Some request bodies differ by country. Where they do, sending the other country's field is rejected with a
400naming it rather than accepted and ignored, and the response omits the fields that do not apply. Terminations are the clearest case: an Australian termination records a reason and an STP cessation type and pays out long service leave, while a New Zealand one values annual holidays in weeks and alternative holidays in days and has neither. Read the request schema for the country the company is in.